Bad Bad Meow EP Release

Happy New Year from Sound Schematic!

Heres a shout out to my friends Bad Bad Meow, whose EP’s I recorded and mixed at Engine Studios back in June. If high energy acoustic punk is your scene, you will definitely dig these guys. The music will be released over the course of the next month. Keep up with them here:

Bad Bad Meow

Bass Feedback!

Here is a quick sample of Beatle Bass feedback, recorded for an upcoming album by local Chicagoans Constantine and the Emperors. As you can tell, the physical performance is just as important as the sound.

Check back soon for the final product, and please excuse the low quality iPhone video.

Search this link on Youtube

<https://www.youtube.com/watch?v=5yphW2D1C30>


Classical Flute and Piano Recording Techniques

Claude Debussy – man of great flute and piano duets

How to record piano and flute in a classical context

Recently, I had the opportunity to record a flute and piano duet. This was my first foray into recording true classical music, and I would like to share my experiences.

For this session, the two performers were playing live in the same room. While I have experience recording pianos, I have never worked with a flute.  There was definitely some trial and error in finding the proper mic placement for this instrument. Trying to get a healthy balance between the airiness and body of the flute proved to be quite a challenge. After going through various flute mic’ing techniques, I ended up with the microphone (Neumann u87) elevated two feet or so behind the performer, aiming at the center of the instrument. To me, this seemed to sound the most natural.

There are so many piano recording techniques. Since this session did not allow for extra time to experiment with the subtleties of various microphone placements, I went with something that was familiar.  For the baby grand piano, I choose to use a 90 degree near coincident stereo pair (NOS) up top and a large diaphragm condenser under the piano, as close to the soundboard as possible. The result is a full and balanced piano sound. The under mic picks up a lot of sustain and adds more low end to the stereo pair. I used Neumann km-54s as the NOS stereo pair and a Neumann u87 underneath.

Signal Chain:

Flute –> u87 –> Hardy M1 –> ProTools

Piano (top) –> km-54 NOS stereo pair –> Trident 80B channels –> ProTools

Piano (bottom) –> u87 –> Hardy M1 –> ProTools

Overall, I would say I am very satisfied with the way things turned out. I think for the type of music being recorded, the final sound is fitting. The mic choices and placements seem to work well in a classical context. Since both performers were in the same room, there was a bit of instrument bleed in each microphone. In the setting of these live recordings, this actually turned out in a favorable mannor. Having the two instruments together helped add a bit of natural reverb and also gave each instrument a place in the room. After doing more research, I think I would like to try a ribbon mic on flute the next time I have the chance to work with one.

Out of the three pieces recorded, one was solo flute, one was a flute/piano duet, and the last was a duet for piano and bass flute. I used the same flute mic’ing technique outlined above on the bass flute. This was my first time ever hearing one of these – what a cool instrument! As far as I know, the bass flute is the same as a regular flute but scaled down one octave.

Here is an excerpt of one of the pieces – this one features the bass flute.

Bass Flute and Piano Duet


Analog Tape Slap Back Tutorial

Using a reel to reel tape machine to add vintage vibe to your recording

I recently did a session with the Ohio based group Manic Sandwich. After two long days of tracking, we had enough material for a six song EP. When time came to mix the project, the band was clear on one thing: they wanted as much slap back as they could get!

I messed around with various tape delay units and plugins, but ultimately decided this mix would be a great chance to print some real tape slap back, using a tape machine. Since this mix was going to be a console mix anyway, why not generate some delay out of the box as well? The mixing was done on a Trident 80B console, and I used an 8 track Otari mx5050 for the slap. I tried my best to document what I was doing for a quick “analog tape slap back tutorial” here!

The set up

This type of effect is commonly used on vocals. I did this on a few tracks, and was quite pleased with the results. However, I found one song where it worked really well on drums. This is the set up I will be reviewing here.

To start with, I bussed the snare, toms, over heads, and hi hat to an unused stereo output in protools. I decided not to include the kick drum, as the extra low end would muddy up the mix. On the patch bay, this stereo send was routed to the tape machine input. From the tape machine output, the signal was routed through a Vintech Dual 72 and into the line inputs of the Trident board. So, here we have the signal chain:

ProTools drum mix –> Otari MX 5050 –> Vintech Dual 72 –> Trident 80B –> ProTools stereo input

note: the Dual 72 was used for extra coloration/saturation of the drum signal from the tape. The Trident channels were used for EQ’ing.

The three heads: erase, record, and playback

How it works

On the typical professional tape recorder, there are three heads: erase, record, and playback. When recording a signal while monitoring off the playback head, there is a brief time difference between the actual recording and the listening. This is a result of the physical distance between the record and playback head. Generally, you wouldn’t notice this during normal tracking, only if you had a consistant playback source.

So when looking at my signal chain above, I used the first two inputs on the Otari to record the drums onto tape. As you can see in the picture below, these two channels were set to “Input”, and are record ready. However, I am monitoring off the playback (repro) head. By changing the tape speed, I am effectively changing the distance between the two heads. For example, a fast tape speed (15 ips) would result in a shorter delay effect, while at a slower tape speed (7.5 ips) the slap back effect would be more pronounced. This machine also has a varispeed control for fine tuning.

It is important to remember that this only works when you are actually recording the signal onto tape. Otherwise, there would be no delay – just a straight doubling of your input source. With this kind of set up, you are fairly limited in your echo time options. In some scenarios, using a plugin is much easier, because the proper tempo can be set right away. Using a tape machine requires more fine tuning and can be a bit of a headache. In my own experiences, I have had the best results using this effect on slower songs that are open, giving the effect room to breathe.

Although I am not sure who actually discovered this, I am of the opinion that tape delay was originally discovered on accident. Some engineer in the 50’s was messing around with a tape machine and realized that the delay effect produced sounds really cool. The rest, of course, is rock n roll history.

Sound Samples

To check out the song I have been referring to in this tutorial, click the link below (this is a premastered version of the mix).

Squash! How to use a Compressor

The common features of dynamics processors explained

When used properly, compression can greatly add to the overall feel of a song. Recorded tracks are clearer, louder, and sit better within the context of the recording as a whole. However, misuse can result in distortion, lack of dynamic range, and an unexciting recording. Lets take a look at how a compressor works.

A compressor reduces input levels that exceed a selected threshold by a specified amount. This reduced dynamic range signal can then be boosted in level at the output, thereby allowing the softer signals to be raised above other program or background sounds. (Huber, Modern Recording Techniques)

Now that we got the textbook definition out of the way, lets look at this tool in real terms. As a dynamics processor, a compressor will “squeeze” together the dynamics (loudness/softness) of an inputed source. Basically, you are taking a sound and gently pushing it into a denser waveform. In effect, this will tame louder signals while making softer sections more audible. Any part of the signal entering the compressor above a certain level, or threshold, will be proportionately reduced to a lesser volume.

Since the loudest portions of the source material will now be turned down, it is possible to boost the entire level of the signal. In other words, since the dynamics have been reduced as a whole, the signal can now be amplified. The loud signals are still prominent, but the softer signals are much more present as well.

Most dynamic processors and compressors have a similar set of parameters. Here they are with a basic explanation of how to use the controls on a compressor:

Input Gain – how much signal is fed to the compressor

Threshold – this is the cut off level that initiates gain reduction. Signals that enter above this level will be attenuated according to the ratio, while signals that enter below will remain untouched. Some units may not have a threshold knob. With these, the input gain level controls the threshold – the higher the input gain, the lower the threshold level.

Ratio – the amount of attenuation. For example, a 3:1 ratio means that for every 3-dB of input signal over the threshold level, only 1-dB will be output. Generally speaking, ratios between 2:1 and 4:1 are considered “light” compression, while anything over 10:1 can be considered “heavy compression or “limiting”. A ratio of infinite:1 (“all buttons in” on an 1176) means only one 1-dB of signals above the threshold will pass to the output stage, no matter how high the input signal. Think of ratio as an input/output gain reduction ratio.

Attack – this controls how quickly the compressor responds to incoming signals that exceed the threshold level. For example, a fast attack time is ideal for sounds that have sharp and quick peaks – like a snare drum or hi-hat. In contrast, instruments such as acoustic guitar or bass have a longer sustain time, and may work better with slower attack settings. With a really fast attack, it is possible to actually hear the compressor kick in, causing a “pumping” sound.

Release – pretty much the opposite of the attack setting, release controls how long the compressor holds on to (stop compressing) a signal after it has fallen below the threshold range. As with attack, you have to experiment with this control to a find the most transparent setting. A quick release time may cause too fast of changes in dynamics, while too long of a release time could steal too many dynamics from the track.

Output/Make-up Gain – sets the level at which the reduced signal enters the mix. Use this to literally “make up” for the amount of gain reduction that has happened in the previous stages.

It is a well known fact: over compression will suck the life out of your signal. Transient peaks and some changes in dynamics breathe variety and flavor into your tracks. Think of compression as a tool to control dynamic range of a signal, but not eliminate it completely. This is why it is important to understand the above list of features. With this being said, trust your ears and remember that using compression is a compromise between your original and processed signal.

Microphones: Dynamic vs Ribbon vs Condensor

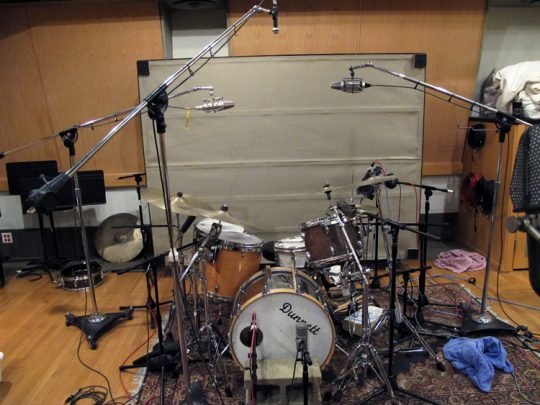
An overview of common microphone design and use in the studio

Since microphones are the literally the first element in the recording chain, they can make or break any recording. Understanding and knowing how to use different microphones is essential knowledge for any serious recording engineer. Although you may not have immediate access to a wide selection microphones, having a working knowledge of general sonic characteristics will come in handy when you are in a situation to use mics that are new to you.

A closer look at the three most common studio recording microphones:

Dynamic

This microphone works on an electromagnetic principle, and features a stiff, thick diaphragm wrapped in a coil of wire. Housed in a magnetic structure, the coils are caused to vibrate by changes in sound pressure – disrupting the magnetic field.

Dynamic mics are extremely tough. Not only can they handle phyisical abuse, but they can also stand up to the loudest sound sources. These mics are many times the go-to choices for kick drums, snares, guitar amps, and bass amps (not to mention live sound as  a whole). They are considered to produce a “clean” and “uncolored” but “non-sensitive” sound.

Famous Examples: Shure SM 57/58, ElectroVoice RE-20, AKG d-12, Sennheiser MD421

Ribbon (aka Velocity Microphone)

Also operating on an electromagnetic principle, ribbon microphones feature a very thin aluminium diaphragm placed between two strong magnets. Acoustic pressure from the front or back causes vibrations based on the acoustic waveform. Compared directly to the moving coil of a dynamic mic, the output signal is quite low. This necessitates the use of a dedicated transformer to boost the signal. Ribbon mics are known to respond well to low impedance pre-amps.

Since the aluminum diaphragm is so thin, this is a very fragile design. Way too often, I hear stories of blown ribbons because of super loud sound sources or hot plugging (non grounded application of phantom power). Don’t let this happen to you! Make sure you handle these mics with great care. That being said, ribbon mics were the go-to studio microphones in the late 40s, 50s and early 60s. Many legendary early rock ‘n’ roll records were recorded with nothing but ribbons. Since the ribbon is open to both the front and back of the mic, it picks up sound in a bi-directional (figure 8 ) fashion. Generally, these are described as producing “dark”, “smooth” and “warm” sounds. Experiment with them on guitar amps (moderate levels, of course!), string/reed instruments, and as drum room mics.

Famous Examples: RCA 44/77, Royer 121, Coles 4038

A word on modern ribbon mics: Advances in technology have resulted in much smaller and more efficient ribbon design. With the use of rare earth magnets and filters in the grill, new designs are much less prone to wind damage and can handle louder sound sources. This design results in a hyper-cardiod pick up pattern as opposed to the traditional bi-directional. The Beyer M160 is a classic example of this new design.

Condensor

Unlike the previous two microphone designs, a condensor microphone uses an electrostatic capsule. Basically, two plates are involved. One is stationary (the back), while the other one reacts to changes in sound pressure. In order to properly function, a constant voltage is necessary to polarize the plates. Differences in sound pressure result in voltage differences between these plates. Now acting as a capacitor (storing voltage), the signal is run to a resistor and then amplified. The two most common approaches for amplification are “field effect transistor” (FET) or vacuum tube.

Capsule sizes often vary among condensor mics. You will commonly hear of “large diaphragm” and “small diaphragm” mics. Since this design requires an initial current to polarize the plates and then to amplify the signal, it is necessary to power these microphones. For solid state mics (FET), this is easily accomplished with phantom power, which introduces a constant 48 volt signal. Otherwise, microphones with a tube circuit have their own separate power supplies. Condensor mics are quite versatile, and are ideal studio mics. They are more sensitive than dynamic mics, and respond well to acoustic instruments, vocals, and drum overheads. As a whole their sonic characteristics could be described as “warm, “full” and “bright”.

Famous Examples: Neumann 67 (tube), Neumann 87 (solid state), AKG 414, Blue “Bottle” series

Hopefully this rough guide will help you understand some basic differences between these three mic classifications. Remember, these are merely guidelines and suggestions.There are many other factors to consider (room, playing style, pickup pattern, etc). There are no hard rules when it comes to recording! Use your ears, and don’t forget to experiment.

Parametric EQ vs Graphic EQ

Differences between the two most common forms of equalization

As probably the most common for of signal processing, EQ is an essential engineering tool. For new comers to audio, the concept of “EQing” can be a bit overwhelming. As with most things in our industry, you get better at it over time (as your ears develop).

So what is equalization? Basically, it is a tool that lets us control the relative amplitude of particular frequencies found in the audible bandwidth. To put it more simply, EQ allows us to boost or attenuate different tones in a recorded sound. There are many good reasons to use EQ, but there are also just as many not to. In many cases, it boils down to a stylistic thing – some engineers favor equalization during tracking, some do not. For me, starting with a strong performance, good mic placement and a good musician are key. EQ only comes into play if necessary.

Some reasons to uses EQ:

– flatten frequency response of a particular mic

– correct specific problems in a recording

– alter sounds for creative reasons

– blend together contrasting sounds

Reasons not to use EQ:

– easy to get carried away, reducing decent sounds to something worse

– no effects can fix a bad recording

Parametric EQ:

Based around certain parameters, this EQ lets you alter certain frequencies with variable bandwidth and gain. Although models vary, typical designs revolve around variable center frequencies.

This type of EQ is common on many popular recording consoles, as well as being the standard EQ in many major DAW’s. One of the great features of parametric equalization is precise (surgical) cuts or boosts in any frequency without effecting other frequencies. In fact they often overlap.

ProTools Parametric EQ (notice the overlapping frequencies)

Graphic EQ:

Although perhaps not as common on consoles anymore, this type of EQ is very popular in live sound. A graphic EQ allows you to cut or boost levels on equally spaced frequencies (ie. octave). These are usually identifiable by a slew of vertical sliders which theoretically give an overall readout of the frequency response curve.

Graphics are generally found in live sound for feedback control. If using enough bands, it is easy to notch out undesirable frequencies (ex: 60 hz electrical hum). Many popular computer applications, such as iTunes, use a digital graphic EQ for the user to shape the sound.

31 Band Graphic EQ

Which EQ is the right one for the job? That depends on the occasion and personal preference. Generally speaking, parametric EQ has a higher learning curve and can cause more extreme changes in the sound. A graphic EQ is more visual and easier to understand right away. Again, a good practice for audio younglings would be to focus on getting good sounds before you try to change them with equalization or other effects. There are no real short cuts here – it just takes a little time.

Click Track: Is it Right for Your Session?

Popular Click Track Myths Examined

One of the first points addressed in any session is the click track. Many musicians believe that using a metronome during recording immediately results in a stiff track with no breathing room. Engineers often favor click tracks because it makes editing and overdubbing much easier. Click tracks are an invaluable tool, but sometimes they are not right.

As mentioned earlier, a common mentality among musicians (especially younger ones) is that using a metronome will result in robotic performance with no emotion or energy. This is the wrong mindset. The truth is that no performance will ever be “perfectly” on time. The purpose of the metronome is simply to provide a rhythmic boundary for the group and prevent the drums from varying in tempo. Any good drummer will be able to work within these bounds and still “groove”.

Recordings done with a click track should end up sounding just as natural as any other recording. If the drummer can groove and the band has a good pocket, this group will have no problem following a metronome. If a drummer refuses to use a click track simply based on the argument that it will “sound robotic”, I interpret this to mean they do no practice enough. For me, I believe a drummers job is to keep the time – if you can’t do this you should probably start practicing! I would guess that a huge majority of the songs played on the radio in the past couple decades has been recorded with a click track – enough reason for most people to realize that click track recordings are the way to go.

However, a click track is not always a good idea. Some examples include songs with multiple time signatures, live recordings with no overdubs, orchestral recordings, inexperienced groups who simply cant perform to a click, and bands so good they do not need one (unlikely). A click track does not mean the performance will automatically be awesome. In most scenarios, I feel it definitely does help glue together a performance, but there are some cases in which a metronome will negatively effect the performance. The most common is when a drummer is speeding up, realizes they have lost the tempo, then slow down to catch it again. This wavering of the tempo results in a super unprofessional sounding recording, and should be avoided. Another example of this could be if a band is significantly altering their performance to accommodate a click track.

If any type of overdubbing is part of the session, it is foolish to not use a click track. This is especially true for songs that have breaks where instruments (drums in particular) drop out. Having a click guide for this type of stuff is like night and day. On this note, it is important to not force a click on a band just because it makes it easier to “protools” a mix later on. The decision to use a click should solely take into account improvements in the music – of course it doesn’t hurt to mention ease of overdubbing in most scenarios.

Generally speaking, I think almost all bands will benefit from click track recording. When used properly, it will increase the tight-factor of any song while doing wonders for intensity and build of a track. As we talked about, however, it is not always right. I like to consider these points for any session I am doing and then decide whether or not a click track is the right choice for the session.

Drum Recording Basics

How to consistently get great drum sounds.

When doing live tracking in the studio, usually the most time consuming task is getting drum sounds. It’s a large and dynamic instrument – adding a bunch of mics can result in a giant phase nightmare.

Different engineers take different approaches to drum miking. Some prefer super tight miking, while others go for a more open sound. As an engineer, I find it good to be flexible, and to be able to adapt to each session and the needs of different artists.

For me, a truly great sounding drum recording is more a result of solid performance and proper drum tuning as opposed to great mics and precise placement. Think about it this way – if the drummer sucks and the drums are out of tune, the resulting recording is still going to sound pretty bad even if you are using awesome microphones placed in the perfect spot.

The best advice I can offer to beginners is to start with the very basics. Listen to records you like and pay close attention to the drums. Familiarize yourself with what a good drum set actually sounds like – how things are balanced, the tuning of the drums, tonal quality of different cymbals, etc. Notice how the sound changes as you move around a live drum set. It is fascinating how much different things sound just a few inches in the other direction.

Remember, you do not need super expensive microphones to get good drum sounds. It is possible to get awesome sounding drums with a single microphone – if your set sounds good to begin with.

As with all things, practice is key to success. At first, learn how to get good sounds out of acoustic drums without any microphones around. Listen to how sound moves around the room. Learn good mic techniques (the internet is a great resource for this) and how to work with what you have available. Start small – just single or stereo miking for the whole kit. As you begin to do sessions and other experimentation, you will begin to notice what works well and what does not. Get as much experience as you can, and remember to enjoy the process.

Drum set up for part of the Tribe of the Mountain session

TOTM Studio Invasion

SSL Console in the ‘A’ room at Engine Studio

The new Tribe of the Mountain album has been in the planning process for a while now. With an open week at Engine Studio in Chicago, we finally got the go-ahead to begin the recording process. Four days (70 hours of which were spent in the studio), things have gotten off to a great start. Basic tracking is done: we have drums, bass, guitar, and even some vocals for all ten songs. Now begins the overdubbing stage…

This recording session has provided me with a lot of good material to share on this blog. I still need to go through a lot of it, but expect more to come very soon!

Abbey Road Studio – Inside Look

A sneak peak into a recording session at the legendary Abbey Road Studio

When you ask some one outside of the record industry to name a famous recording studio, usually one name comes up right away. That is Abbey Road Studio, the legendary English production house where it seems every famous band of the rock n roll era recorded an album. Perhaps most notable is the Beatles album named after the studio.

Anyway, I found myself stumbling around the internet late one night looking for new music. Specifically, I was doing a youtube search on the group Portico Quartet, a modern jazz group whose first album I found to be quite good. Although I did not know this at the time, the band recorded their latest album at Abbey Road studio.

The first video I found of them was filmed during a live take at the studio. It is quite beautifully shot, and the video not only shows the musicians performing super well, but it also gives an excellent peek inside an Abbey Road session. More interestingly (to me at least), the different microphones used and the placement of each is crystal clear in the video. Although I have no idea what producer John Leckie did during mix down, it is very cool to see just how many mics were used (on the drums and sax specifically) and where they were placed. The link to the photos offers angles not used during in the video.

Hopefully this video gives you some insight into a professional studio set up, and maybe even inspires your decisions for a future session.

Portico Quartet – Line (Take 5) at Abbey Road from York Tillyer on Vimeo.

Produced and Engineered by John Leckie
Still images of the session here
More info on Portico Quartet: http://porticoquartet.com

Home Recording Revolution

An examination of the industry as affected by affordable home recording equipment

A long long time ago when people only wore dress clothes and everything was black and white, you had to go to a big studio to record. I am talking about the 30s through the 90s. If you were at all interested in recording music, you had to find a place with all the necessary equipment. Analog gear was expensive, tricky to operate, and needed constant maintenance – not to mention required a lot of space!

Things look a little different in todays digital age. Although I do not know any exact statistics, I would venture to guess that a great majority of recordings made today are done at home. How can this be? Lets take a quick look at the home recording revolution.

Platform Shift: Music consumption has changed. In just the past decade, the preferred way of listening has gone from CDs to digital files – solid media to intangible megabytes. Big record companies were not ready for this, and responded by suing their customers for file sharing.

Advance of Digital Recording: Bulky analog gear was no longer necessary to record a good sounding album. Theoretically, a digital audio workstation (DAW) replaces the mixing board, effects processors, outboard gear, patch bay routing, tape machine, and many of the other aspects of an analog recording studio.

Smaller and Cheaper: Computers take up much less space than a giant mixing console or a 2 inch tape machine. As computers have gotten smaller and more powerful, they have also become less and less expensive. Along with this, other home recording equipment (microphones, cables, stands) necessary to make a basic recording are widely available and often inexpensive.

If you add all these elements together, the home recording take over makes perfect sense. Digital music files are easily created from digitally recorded sessions. Inexpensive home recording equipment and a relatively low learning curve have made the field much more accessible to newcomers. Today, it is fairly easy for singer songwriters and garage bands to make their own recordings – often with good sounding results. I have done a good amount of home recording, both for professional and personal purposes. Expect much more blog space to be dedicated to home recording tips, tricks, theories, and related topics in the near future! Home recording is not only fun, it seems more and more to be the future of recording – and definitely the most accessible form of music production.